Best complete information about how to cooking

Saturday, January 8, 2022

How To Prepare A Cooking Rice

How to prepare a cooking rice ~ If you like a little salt add it now. Then the next step for a bowl of delicious sticky rice is to steam and partially cook them. Indeed lately has been searched by users around us, maybe one of you. Individuals now are accustomed to using the net in gadgets to view video and image information for inspiration, and according to the name of this article I will talk about about How To Prepare A Cooking Rice The basic preparation of rice includes 2 parts water and 1 part rice but this will depend on the type of rice and the desired texture.


How To Cook Perfect Rice On The Stove The Mom 100
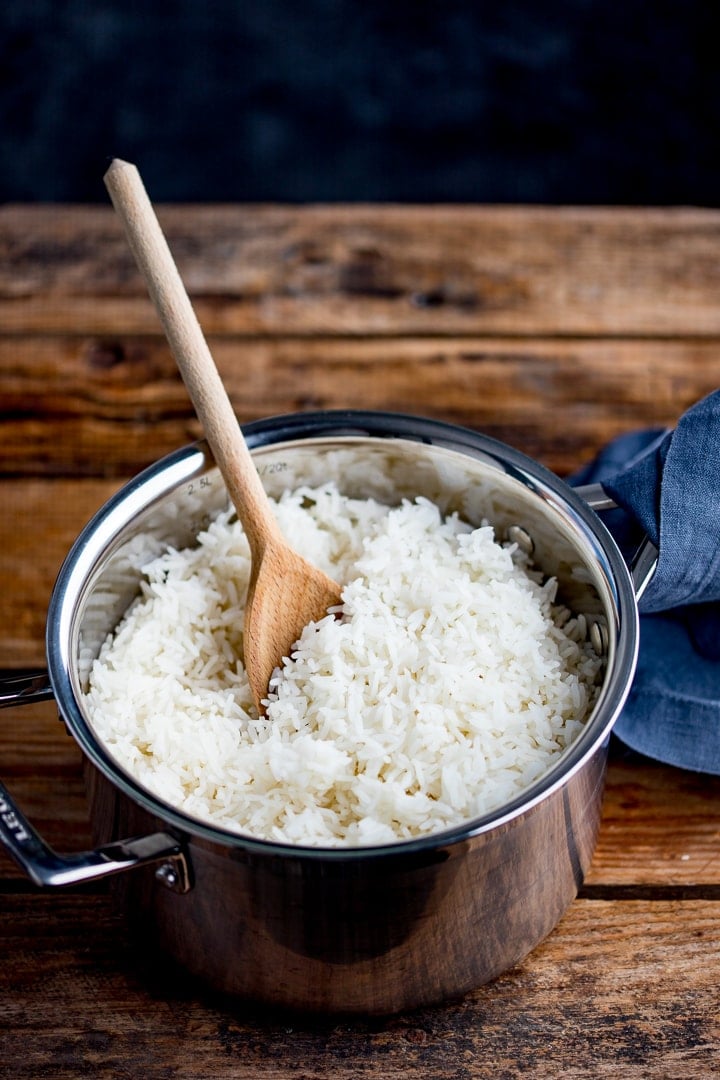
Source Image @ themom100.com

How To Cook Perfect Rice On The Stove The Mom 100

Let your rice cool after cooking it speeding up the process by spreading it on a baking sheet but make sure your rice isnt hot anymore before you do to increase the surface area. Cook 3 to 5 minutes or until noodles are tender but firm. Your How to prepare a cooking rice images are available in this site. How to prepare a cooking rice are a topic that is being searched for and liked by netizens now. You can Download or bookmark the How to prepare a cooking rice files here

How to prepare a cooking rice - Firstly cook the sushi rice on high flame for 5 minutes then lower the heat and cook until the sushi rice gets softened in 18 minutes. Heat the pre-cooked rice in the microwave or on the stove top over low heat. HEAT oil in large skillet or wok on medium-high heat. Put inside the pot.

Stir fry 1 minute or until heated through. Place on the hob at the highest heat. Store the rice in the freezer or refrigerator. STIR in rice noodles and tamarind mixture.

Then place kombu on the top cover the lid and cook the rice. This will help the grains cook more evenly. If you dont have a baking sheet use any flat vessel where you can spread out your rice. Fluff the rice with a rice paddle and serve with another recipe of your choice.

Cooked rice keeps about six days in the refrigerator or up to six months in the freezer. 5 Take it away from the heat and allow it to steam while covered for 10 minutes. Refer to the guide below for the right water to rice ratio eg. What Rice is best for paella.

If you have time soak the rice in cold water for at least 30 minutes. Furthermore if you are using an instant pot or sushi rice cooker then prepare sushi rice according to the labelled. Pour the rice into a pan over a low heat then add the butter or oil if using and stir to coat the rice grains. It will reduce the total cooking time and produce a softer texture.

Follow the guidelines below for perfectly cooked rice. After it cools place the baking sheet in the fridge. Keep rinsing until the water is clearthis is key. Put the rice into a saucepan and add the appropriate amount of water.

1 cup of water to 1 cup of rice Cook the rice in the cooker. How To Cook Perfect Rice Without Pressure Cooker - 2 Ways Rice Cooking - Easy To Make. Instructions BRING large pot of water to boil. Let the rice sit for 5 minutes with the lid closed.

Rinsing cuts down on the starchiness that helps make rice sticky. The usual cooking time for sushi rice is about 23 minutes. We love using medium grain or jasmine rice. How To Cook Perfect Rice Without Pressure Cooker - 2 Ways Rice Cooking - Easy To Make Rice - Varun - YouTube.

You may end up rinsing six times or more depending on the kind of rice. Of water per 1 cup of rice before reheating it. Take it off the heat before the rice is totally cooked through and cover the pan in tinfoil leaving it to cook under its own steam for 5-10 minutes. Soaking the rice is recommended for some types of rice but is generally unnecessary for most white rice.

Stir fry 30 seconds or until fragrant. Always rinse your rice in a mesh strainer before you cook it. A dd 1 part rice to a pot with a dab of oil or butter and cook over medium until it looks toasted and smells nutty 2 to 3 minutes. Store the rice in 1- or 2-cup serving sizes for convenience.

3 Take down the heat to make the rice simmer. I like to place a damp cloth on an inner steamer rack and spread my rice on top. When done the rice cooker will automatically switch to keep warm. 4 Cook the rice for about 16 to 18 minutes until the rice is tender and all the water is gone.

Use boiling water to speed up the cooking time but cold water will work fine too. Rinse the rice thoroughly in cold water until the water is clear.

How Is Baking A Cake A Chemical Change

How is baking a cake a chemical change ~ Baking a cake is an example of. Physical and Chemical Changes. Indeed recently has been hunted by consumers around us, perhaps one of you. Individuals now are accustomed to using the internet in gadgets to see image and video data for inspiration, and according to the name of this article I will talk about about How Is Baking A Cake A Chemical Change The ingredients of the cake that are taken initially for preparing the cake are considered as reactants.


Physical And Chemical Changes What Is A Physical
Source Image @ slidetodoc.com

Physical And Chemical Changes What Is A Physical

How is baking a cake a chemical reaction. Apart from the cake that. Your How is baking a cake a chemical change pictures are ready in this website. How is baking a cake a chemical change are a topic that is being searched for and liked by netizens today. You can Get or bookmark the How is baking a cake a chemical change files here

How is baking a cake a chemical change - Thats why chemical reactions are involved in baking a cake. Heat also causes protein from an egg to change and make it firm. Baking a cake is a chemical change not a physical change. NaHCO3 NaHC4H4O4 Na2C4H4O4 CO2 g H2O.

Baking a cake is a chemical change because the baking powder or soda whichever one undergoes a chemical reaction. Heat causes protein from the egg to change and make the cake firm. Understanding the differences between chemical and physical changes helps provide a foundation for science and chemistry. Demonstration and description of the physical and chemical changes observed while baking a cake.

Baking a cake is a chemical change because the baking powder or soda whichever one undergoes a chemical reaction. Some of the changes involved in baking a cake. When baking a cake it is considered as a chemical change because you cant get your ingredients back and we know that it is a chemical change because heat energy is involved. Baking a cake is a chemical reaction due to heat helps baking powder produce tiny bubbles of gas which makes the cake light and fluffy.

When the baking temperature reaches 300 degrees Fahrenheit sugar undergoes what is known as a Maillard reaction a chemical reaction between amino acids proteins and reducing sugars. The baking part is where slow uniform heat is applied to your ingredient mix. How do you know baking a cake is a chemical reaction. Accordion collapsedA physical change Partly right.

Physical and Chemical Changes in Cake Baking. A few things can happen when you bake a cake. The last physical change. A chemical reaction occurs when substances are mixed and react with each other at.

The heat helps baking powder or soda produce tiny bubbles of gas which makes the cake light and fluffy. A chemical change is change in which the components loose their property completely as you know that when we back a batter of cake the components of cake cannot be brought back to their original state as they loose their property that is why it is a chemical change. Webew7 and 3 more users found this answer. Crash Course Kids.

Baking a cake is a chemical change because the baking powder or soda whichever one undergoes a chemical reaction. You can tell because of the bumps or air bubbles. When you are mixing your cake it includes such ingredients as water oil and eggs. Some chemical reactions to keep in mind while doing this tasty experiment are.

You can tell because of the bumps or air bubbles. Baking a birthday cake. Baking soda and vinegar mixing together. When the baking temperature reaches 300 degrees Fahrenheit sugar undergoes what is known as a Maillard reaction a chemical reaction between amino acids proteins and reducing sugars.

Melting solids into liquids boiling liquids giving off gases preparing solutions of solids and color changes are a few of them. Heat helps baking powder produce tiny bubbles of gas which makes the cake light and fluffy. Is baking a cake physical or chemical. When you place your ingredients in the oven the batter changes from a liquid to a fluffy yet solid cake.

Baking powder being CO2. This is a physical change because the butter went from a solid to a liquid. This is a physical change because the yolk of the eggs were whole and now they are liquid. The result is browning which forms the crust of many baked goods such as bread.

Baking a cake is a chemical change because the baking powder or baking soda will undergo a chemical reaction. The heat helps baking powder or soda produce tiny bubbles of gas which makes the cake light and fluffy. Baking a cake is a chemical change because the baking powder or soda whichever one undergoes a chemical reaction. Sugar does much more than just sweeten a cake.

Heat helps baking powder produce tiny bubbles of carbon dioxide which make a cake light and fluffy. Heat helps baking powder produce tiny bubbles of gas which makes the cake light and fluffy. Sugar does much more than just sweeten a cake. Burning a piece of paper.

The final cake that is created is the product. As you bake a cake you are producing an endothermic chemical reaction that changes ooey-gooey batter into a fluffy delicious treat. Describing Chemical Reactions. A glass falling and shattering on the floor.

Is baking a cake physical or chemical. Baking powder which is baking soda with an additional acidic salt releases carbon dioxide twice during the baking process once when it hits water and again when it reaches a certain temperature in the oven. At first glance many people think this is a physical change but it is a chemical change. Baking a cake is a chemical change because the baking powder or baking soda will undergo a chemical reaction.

As you bake a cake you are producing an endothermic chemical reaction that changes ooey-gooey batter into a fluffy delicious treat. Baking of a cake can also be considered as a chemical reaction. The baking part is where slow uniform heat is applied to your ingredient mix. The next change happened when we beat the eggs.

If you like cooking you may consider yourself to be an amateur chemist even if you do not know what a stoichiometry is. See also - Is burning a chemical change This is where the real magic occurs as is evident by the wonderful smell coming from the kitchen. Heat helps baking powder produce tiny bubbles of gas which makes the cake light and fluffy. Is Baking A Cake Physical Or Chemical Greenstarcandy How Does A Physical Change Differ From A Chemical Change In Matter Is Baking A Cake Physical Or Chemical Greenstarcandy Chemical Reactions Involved In Baking A Cake Is Baking A Cake A Chemical Change Baking A Cake Is A Chemical What Is A Chemical Equation Definition Examples Video Review Matter 4 The Happy.

How To Cook Burger With Air Fryer

How to cook burger with air fryer ~ Season both sides of hamburger patties with desired amount of salt and pepper. It might seem odd to you at first but trust me cooking hamburgers in the air fryer is where its at. Indeed lately has been searched by users around us, perhaps one of you. Individuals are now accustomed to using the net in gadgets to view video and image data for inspiration, and according to the name of this article I will discuss about How To Cook Burger With Air Fryer Spray the fryer with a natural cooking spray that doesnt contain propellants.


Air Fryer Hamburgers Real Mom Kitchen Air Fryer
Source Image @ www.realmomkitchen.com

Air Fryer Hamburgers Real Mom Kitchen Air Fryer

Fry for 4 minutes flip then fry an additional 3 minutes. Add the burger patties to the fryer leaving a little breathing room around each one. Your How to cook burger with air fryer images are ready in this website. How to cook burger with air fryer are a topic that is being hunted for and liked by netizens now. You can Find and Download or bookmark the How to cook burger with air fryer files here

How to cook burger with air fryer - They should turn golden brown on the outside and have a medium texture on the inside. Cook for 5 minutes at 375 degrees. Start with either hamburger patties or gr. Preheat air fryer to 400F.

Once the air fryer is hot add the frozen turkey patties into the air fryer tray. To cook a well-done burger cook the Beyond patties for 9 minutes turn and cook for another 9 minutes or until the internal temperature is. Add patties in a single layer into the basket. Place the seasoned patties in the air fryer basket.

Spray the air fryer basket with non-stick cooking spray or the foil-lined air fryer basket. It depends on your Air fryer size. Open the air fryer basket and with the help of a spatula flip them over. Were using Kinders Buttery Burger Blend but.

Preheat the air fryer to 375 degrees. Arrange the patties in the air fryer basket and cook for 3-6 minutes to your preferred doneness flipping halfway through. When ready set temperature to 400F. Preheat your AirFryer to 400F and put the burger patties on a grill pan if available.

Cook your air fryer burger for 8-10 minutes at 350F176C. It is the actual quality of an air fryer that does not require you to stand all the time with the fryer while your food is cooking. Make sure the burger patties are fully cooked. Spray both sides of patty with fat free cooking spray.

First preheat the air fryer to 380 degrees Fahrenheit. When the air fryer burgers have cooked entirely one can cheese slices as per their will and. Preheat Air Fryer to 370 degrees F. While patties are resting warm the buns in the air fryer at 380F193C for about 1 minute.

Preheat an air fryer to 400F for 5 minutes. Air fry at 380F193C for about 30 seconds to 1 minute to melt the cheese. Make sure that there is no overlap so that they can cook evenly. Else put the patties on a parchment liner in your Air Fryer basket.

After 6 minutes open the basket and season the burgers. It is so easy to make great tasting hamburgers in your air fryer. Add the slices of cheese on top of the cooked patties. Flip with spatula two three times.

Preheat the air fryer Typically youll just need to let the air fryer run at the cooking temperature 400F is recommended for 5 minutes. Prepare the hamburgers your favorite way and preheat the air fryer to 390F 199C. For best juiciness cover the patties and let rest for about 3 minutes. Just place the patties in the fryer for few minutes and that is it.

Here are some essential steps on how you can cook these burgers in an air fryer. Lightly spray the air fryer basket with oil to avoid sticking. How Long do Air Fryer Hamburger Patties Take to Cook. A few minutes and no mess thats all it takes.

Open the fryer and add cheese slices to the top of the burgers. Place the frozen patties properly into the. Flip and season the other side. Again cook them for another 4 minutes.

Put the frozen patties in your air fryer basket and cook for 6 minutes at 380 degrees F. At the 5 minute mark halfway through cooking your. Next season them with garlic powder olive oil or more seasonings. Cook for eight minutes total.

However unfreeze the steaks if frozen. Using your hands gently mix together beef Worcestershire salt pepper paprika granulated garlic and granulated onion in a large. Place your hamburger patty into the baskettray of your air fryer. First take a couple of sirloin steaks or more.

This is really going to. Cook for 6-7 minutes flip burgers and continue cooking until internal temperature reaches 160. Cook the burgers for 3 to 5 minutes at 350 degrees. If you did the preheating in the previous step then set the fryers.

Place burgers inside of air fryer making sure not to overlap the burgers.

How To Clean Artichokes Before Cooking

How to clean artichokes before cooking ~ Youll need disposable gloves optional but theyll protect your hands from possible coloring a large bowl with water one large lemon and 4-8 artichokes. Use a strong vinegar solution in very cold water when soaking. Indeed lately is being hunted by consumers around us, maybe one of you. Individuals now are accustomed to using the internet in gadgets to see video and image data for inspiration, and according to the name of the post I will discuss about How To Clean Artichokes Before Cooking The trick to making a great grilled artichoke is doing most of the cooking before it ever hits the grill.


How To Clean Artichokes 2 Sisters Recipes By Anna And Liz
Source Image @ 2sistersrecipes.com

How To Clean Artichokes 2 Sisters Recipes By Anna And Liz

Snap off the dark-green outer leaves of the artichoke until only the pale tender inner leaves remain. Finish them on a hot grill. Your How to clean artichokes before cooking picture are ready. How to clean artichokes before cooking are a topic that is being hunted for and liked by netizens now. You can Get or bookmark the How to clean artichokes before cooking files here

How to clean artichokes before cooking - How to clean artichokes - cooking tutorial. Before you start to clean your artichokes take 1 lemon and cut it in half. You can cook artichokes ahead of time and store them for several days before eating or. To begin the cooking you need to boil them for 5 to 10 minutes.

How to clean artichokes - cooking tutorial - YouTube. Throw the squeezed lemon into the bowl reserving the other half to rub onto the cut surfaces of the artichoke as you clean it to prevent discoloration. How much stem you remove depends on the preparation. Squeeze half into a glass or ceramic bowl and fill the bowl with cold water.

When soaking check for bugs and worms by spreading out the leaves submerging and squeezing the artichoke closed to try and expel anything hiding in the leaf folds. This is to par-cook them paving the way for even grilling. For Roman-style artichokes or grilled artichokes remove only the browned bit at the end and leave the bulk of the stem attachedyoull peel it later. Just make sure you have your sauce ready to go before you start to clean the artichokes.

You can keep the part closest to the artichoke or if you want to keep the entire stem you should peel and remove its outsides. Immediately submerge the prepared artichoke in a bowl. Cut off the tough stems separate the leaves and submerge them in the water. If playback doesnt begin shortly.

Check on them after 15-20 minutes. It is also important to know that artichokes oxidise very easily which means that they go off very quickly. The base or heart of the artichoke is deliciously soft and the goal of eating an artichoke. It depends on the size of them and how hard they are as well.

If you have a big artichoke already floating in that water as I did after prepping these for the photos itll look like a mama artichoke with her little brood of baby artichoke-lings. How to clean fresh artichokes. Let everything rest with the lid until it has reached room temperature then drain the artichokes and eat them as you like pouring the water in a glass bottle. 1 liter of water.

Take a cooked artichoke and spread open the petals to expose the center petals. You have been warned. To prevent this from happening while washing and peeling them submerge them in water with salt and lemon to prevent oxidation and keep them in optimum condition during preparation. With this movement youll remove the toughest parts.

Once theyve boiled remove them from the water. As each artichoke is done drop it in your bowl of cold lemon water and cover with a clean wet kitchen towel to keep the artichokes submerged. Rub any patches of dirt off the leaves and let them sit in the water for a couple of minutes. Cut off and discard the stem end of the artichoke.

Coat the artichokes with olive oil and seasonings. Remove the greens and give them a quick rinse. To keep them from browning make sure you hold the prepped artichokes in lemon water until youre done removing the chokes from. We recommend using latex gloves when cleaning artichokes to prevent you fingers from blackening.

Wash the artichokes put them in a pot of water bring it to a boil and cook for about 15 minutes before turning off. Remove the smaller petals by twisting clockwise to expose the fuzzy choke. Cut off the top third of the artichoke and all but 1 inch of the stem. Because the inside choke was taken out they will cook MUCH faster than if you leave it in.

The dirt will sink to the bottom. Plug up a clean sink or use a really large bowl and fill it with cool water. It can always be thinned out with more water if it starts to get too thick. I pressure cooked mine.

With a spoon carefully remove the fuzzy top layer without scraping away the artichoke heart. Ocean Mist Farms shows how to prepare a fresh artichoke for cooking. Put your hand on the stem and push downwards. Using a paring knife peel away the tough outer layer of the stem and remove the base of the leaves all around.

The artichoke should be steamed and cooked till fully tender but not overly. Advertisement Once the artichokes have been cleaned top half discarded stem peeled fuzzy fibers and spiky purple leaves removed with a spoon go ahead and throw them in a pot of salted boiling water. Cut a lemon in half and squeeze the juice into. Using a small sharp knife remove the choke from each artichoke.

Steam or pressure cook your artichokes. For basic steamed artichokes youll want to cut close to the base so the artichoke can stand. Start with halved or quartered artichokes. Run the artichoke under cold water pulling apart the leaves to carefully rinse out the vegetable and remove any impurities.

Steam them for 20-30 minutes.

How Long After Cooking A Turkey Is It Safe To Eat

How long after cooking a turkey is it safe to eat ~ Cover your turkey with foil during cooking but uncover it for the final 30 minutes to brown the skin. Even without indicators of deterioration such as a bad odor or a sticky surface harmful bacteria may be present. Indeed recently is being searched by consumers around us, maybe one of you. Individuals now are accustomed to using the internet in gadgets to see video and image data for inspiration, and according to the name of this post I will talk about about How Long After Cooking A Turkey Is It Safe To Eat You can safely leave cooked turkey out at room temperature for two hours -- or one hour if the temperature is above 90 degrees Fahrenheit -- says the United States Department of Agriculture.


Solving The Heated Debate Over Turkey Temperatures Pittsburgh Post Gazette
Source Image @ www.post-gazette.com

Solving The Heated Debate Over Turkey Temperatures Pittsburgh Post Gazette

Refrigerated turkey leftovers are usually considered safe to eat within three to four days after initial cooking but a lot depends on your specific circumstances particularly how well the turkey was cooked in the first place and how quickly the leftovers were stored. Never leave leftovers at room temperature. Your How long after cooking a turkey is it safe to eat images are available in this site. How long after cooking a turkey is it safe to eat are a topic that is being searched for and liked by netizens today. You can Download or bookmark the How long after cooking a turkey is it safe to eat files here

How long after cooking a turkey is it safe to eat - Your turkey may have started to spoil. Typically the amount of time for resting turkey depends on its size. Turkey slices or pieces - 4 months Turkey covered with broth or gravy - 6 months Cooked turkey or poultry dishes - 4 to 6 months Stuffing and gravy - 1 month. We spent Thanksgiving at my in-laws with the usual spread prepared in the usual ways and ate at about 3pm.

You Have Two Hours at Eat and Store Leftovers Once the Turkey Is Cooked First you want to make sure you cook your turkey. Store turkey in refrigerator uncovered for up to 24 hours before cooking. Throw them away. This means you have until the Monday after Thanksgiving to eat all those delicious leftovers or place them.

Use the following timetables to determine how long to cook your turkey. These times are approximate. If you leave it in too long it will get too salty. If frozen leftover turkey is safe to.

Always use a food thermometer to check the internal temperature of your turkey and stuffing. Because of this distinction you may safely use it even after the sell by date has. Remember for 12 15 pounds of turkey 20 minutes time is sufficient enough. According to the USDA the mantra is.

Bacteria prospers at this temperature increasing the risk of foodborne illness. In case you have roasted a large bird for the party. 3-4 days if cooked. Yes you can brine your turkey ahead of time.

Of course all foods last for a shorter period of time if they are not stored properly. When stored in the refrigerator turkey does not last as long. It is possible to over brine meat. Heres a look at the guidelines for keeping your turkey dinner safe.

This allows it to cook a little more. Perishable food that isnt refrigerated within two hours of coming out of the oven or refrigerator can become unsafe. How long can a fresh turkey stay in the refrigerator. To save turkey leftovers remove the stuffing from the cavity cut the turkey off the bone and refrigerate or freeze all leftovers.

Didnt get a chance to brine nor cook it because we spent Thanksgiving at my in-laws. How long can you keep uncooked turkey breast in the refrigerator. Cooked turkey that has been thawed in the fridge can be kept for an additional 3 to 4 days in the refrigerator before cooking. Refrigerate or freeze your leftovers within 2 hours of cooking.

For more information about thawing a turkey go to Turkey Basics. Simply so can you brine a turkey too long. Deli Turkey lasts for. When stored properly in a refrigerator turkey leftovers generally stay good for 3 to 4 days.

Cooked turkey that has been left out for longer than 2 hours or 1 hour above 90 F should be discarded. One of the most common food safety questions is How long will cooked turkey stay fresh in the refrigerator According to the US. But remember turkey like a lot of other proteins usually has a sell by date and not a use by date or expiration date. Bacteria can survive in stuffing that has not reached 165F and may then cause food poisoning.

If you cook stuffing in the turkey wait 20 minutes after taking the bird out of the oven before removing the stuffing. Turkey that was thawed in the microwave. How long is turkey safe to eat after cooking. How long can cooked turkey sit out before it becomes unsafe to eat.

Bacteria can multiply quickly between 40 F and 140 F. Nov 27 2010 0103 PM 54. 2 Hours2 Inches4 Days. Remember if youre heating up the leftover turkey ensure it.

I asked my partner if we should put it in the. It takes approximately 24 hours for every 4 to 5 pounds of whole turkey to thaw in the refrigerator. The Basic Rules For Leftovers. Bought the turkey breast frozen on Tuesday Nov 21 and left it in the fridge to thaw.

Refrigeration slows but does not stop bacterial growth. To stop the meat drying out baste it every hour during cooking. How long does cooked turkey last after being frozen and thawed. The freezer time shown is for best quality only - foods kept constantly frozen at 0F will keep safe indefinitely.

Turkey Left Out Overnight or Longer - Would YOU Eat It. Remove turkey from brine rinse and pat dry and place on rimmed baking sheet or inside roasting pan. I just found it in the bottom shelf this morning and thought Id check to see if it still was safe to cook. It is safe to cook a turkey from the frozen state.

Snyder says that there isnt a specific number of days the leftover turkey will last in either the freezer or refrigerator. She points to the USDA FoodKeeper app for best guidancethe tool notes that refrigerated cooked turkey should be eaten within four days and frozen turkey leftovers within six months for premier quality. The answer is simple. 2 Hours from oven to refrigerator.

If you consider the standard resting time of the prepared meat it is taken as 20 minutes after cooking. Leftovers can be kept in the refrigerator for three to four days. Allow 45 minutes per kilogram plus 20 minutes for a turkey under 45kg. How quickly must I eat it.

Cooked turkey can be stored in the refrigerator for three to four days. Later that night I noticed the turkey was still sitting on the stove covered in foil. Allow 40 minutes per kilogram for a turkey thats between 45kg and 65kg. The safe time limit for refrigerating raw poultry is 1 to 2 days.

Cooked turkey is safe in the fridge for up to three to four days so you can get creative with some recipes over the next few days. Department of Agriculture USDA. Once the turkey is thawed you can keep it in the refrigerator for 1 to 2 additional days before cooking. If refrigerated correctly it is safe to eat within 3 to 4 days.

The cooking time will take at least 50 percent longer than recommended for a fully thawed turkey. Leftover cooked turkey is safe to eat but only within a certain time frame. USDA recommends using cooked turkey within 3 to 4 days kept refrigerated 40F or less. If turkey stuffing or gravy is left out at room temperature 40 to 140F for over 2 hours it may no longer be safe to eat.

Pathogenic bacteria can grow rapidly in the Danger Zone the temperature range between 40F and 140F.

How To Cooking Dressing

How to cooking dressing ~ Mix well taste and adjust seasoning if needed. You can bake the stuffing as soon as you make it and freeze it then too. Indeed lately is being hunted by consumers around us, maybe one of you personally. Individuals now are accustomed to using the net in gadgets to see video and image data for inspiration, and according to the name of this post I will talk about about How To Cooking Dressing In order to be called stuffing the dish technically needs to be stuffed and cooked inside of a bird most traditionally a turkey.


Family Favorite Southern Cornbread Dressing Lana S Cooking
Source Image @ www.lanascooking.com

Family Favorite Southern Cornbread Dressing Lana S Cooking

It has become a great family tradition. The baking time really depends on the amount of stuffing whether its just leftovers or you made the whole thing in advance. Your How to cooking dressing pictures are ready. How to cooking dressing are a topic that has been searched for and liked by netizens now. You can Get or bookmark the How to cooking dressing files here

How to cooking dressing - Continue to bake until the dressing is set throughout. Heat the oven to 350F and transfer the dish to an oven-safe dish or just keep it in the dish that it was originally cooked in then cover. Add onion and celery and cook stirring often until tender 10 to 12 minutes. Cook until the center of the stuffing reaches 165 F as measured with a food thermometer.

The problem with this is that the stuffing needs to be cooked to a minimum of 165 F in order to kill foodborne bacteria from the turkey juices. Add about a half-cup to a cup at a time to give the bread time to soak. Pour dressing into two 913 baking dishes and bake until lightly browned about 30 45 minutes. How to cook cornbread dressing.

Consult your slow cooker manual for approximate times. Why do you put eggs in stuffing. These days because of increased awareness of food safety cooking it separately is more common. Slowly pour the gum and oil mix into the vortex.

Stir in bread cubes and remaining ingredients. Make up to 2 days ahead and store covered and uncooked in the fridge. Place stuffing cubes celery mixture and seasonings in a large bowl. If your stuffing is too wet and gummy turn it out onto a baking pan or cookie sheet.

Start cooking on the high setting for at least 1 hour before reducing the setting to low. Keep stuffing tightly covered with foil and bake until mostly heated through about 25 minutes. For variety mix in a pound of sausage or raisins when cooking the onions and celery. Melt butter in a Dutch oven over medium-high heat and sauté onion and celery or whatever else you choose to include until soft about 5 to 10 minutes.

Stir in stuffing mix reserved vegetables. Season with poultry seasoning. Turn on the oven to 350 F. Remove foil and bake until crispy edges form about 10 to 20 minutes longer.

And doing that means overcooking the rest of the bird. When ready to bake preheat oven to 400 degrees. Place your salad dressing in a blender and blend on high to create a vortex. My mom used to include my sisters and I in the breaking of the bread.

In a large skillet heat oil over medium-high heat. This is a great stuffing recipe that is very easy and fun for the whole family. Prepare a bread-based stuffing recipe according to the recipes instructions. Then bake until dried to the desired level.

Make ahead and freeze. Make ahead and refrigerate. Bake the day you plan to serve it. After youve assembled the stuffing refrigerate it up to 1 day in advance.

If the center of the dressing moves then the dressing is not cooked through in the center. Keep stuffing tightly covered with foil and bake until mostly heated through about 25 minutes. If its simply baked in a casserole dish its referred to as dressing. Allow the bread to get stale a few hours or overnight.

Saute celery and onion until tender. To test doneness shake casserole dish lightly. Adding the right amount of stock to the stuffing is essential to getting an ideal texture but so is how and when you add it. Place the dressing in a well greased 25 quart baking dish or 913 baking pan or dish.

Pour 12 cup of hot stock on top of the stuffing. When ready to bake preheat oven to 400 degrees. How to Cook Stuffing. Mix the gum into the oil.

Stuffing not used in the bird may be cooked with the gizzards. Other than that there isnt much of. The most important ingredient of stuffing may be the binder for it keeps all the other elements in place. Break it up and spread it in an even layer.

Blend another 30 seconds or so until the salad dressing has thickened. Use butter to grease a 3-quart casserole dish or a 9 by 13 inch baking dish. Spoon the stuffing into the dish. To make stuffing in the oven use the following steps.

The ratio should be 1 part gum to 5 parts oil. For a fluffy texture use eggs. Reheat cooked stuffing in a 350 degree oven covered for 30 minutes or until warm throughout. If these guidelines have not been followed discard the stuffing.

Remove foil and bake until crispy edges form about 10 to 20 minutes longer.

How To Prepare Artichokes In Microwave

How to prepare artichokes in microwave ~ How to Cook One Artichoke in the Microwave. Two medium-sized artichokes will take around 10 minutes to cook in an 800-watt microwave oven. Indeed recently has been hunted by users around us, perhaps one of you. People now are accustomed to using the net in gadgets to view video and image data for inspiration, and according to the name of this post I will talk about about How To Prepare Artichokes In Microwave Microwave the Artichoke.


How To Cook Artichokes In The Microwave Savory Tooth
Source Image @ www.savorytooth.com

How To Cook Artichokes In The Microwave Savory Tooth

Its best to check the artichoke at the 6 minute mark to make sure they dont get overcooked. Season with salt and pepper. Your How to prepare artichokes in microwave images are available. How to prepare artichokes in microwave are a topic that has been hunted for and liked by netizens today. You can Download or bookmark the How to prepare artichokes in microwave files here

How to prepare artichokes in microwave - You can cook artichokes on the stove or in the pressure cooker. After following the preparation tips microwaving the artichoke will take approximately 18 to 20 minutes depending on the size of the artichoke and the power. Microwave on high for 8 minutes small artichokes or 9 minutes mid to large artichokes. Trim the outer leaves so.

Add a teaspoon or two of salt the artichoke will just be sitting it in not submerged. Artichokes are boiled in the microwave and steamed until soft. Then set it to HIGH and cook for 15 to 20 minutes. How much stem you remove depends on the preparation.

How long do you cook an artichoke in the microwave. Ocean Mist Farms shows you how to quickly cook fresh artichokes in a microwave. MICROWAVE THE ARTICHOKES Place the artichoke in a microwave-safe dish large enough to hold the artichokes but small enough to fit in the microwave. Snap off tough outer leaves.

The artichokes will be ready when a knife easily pierces the stem. And if it quickly goes in the artichokes are prepared. Set the artichokes in the salted boiling water cover the pan reduce the heat to maintain a steady simmer and cook 20 minutes. Cut off and discard the stem end of the artichoke.

Cut the top half of the artichoke into 1 inch and discard the prickly pear tips. How to Cook Artichokes in the Microwave Step 1. How long do you microwave artichokes. The artichokes will be ready when a knife easily pierces the stem.

Microwave the artichokes on high power for 4 minutes. Cover tightly with plastic wrap. The artichokes are cooked in the microwave by effectively steaming until tender. Easy Steamed Artichokes Recipe Martha Stewart.

Place cut-side down in a shallow microwave-safe dish. Keep in mind that the dish you cook the vegetables in will also influence the cooking time. How long do you cook an artichoke in the microwave. Bring about 12 inch water to a boil in a pan deep enough to hold the artichoke s standing up.

Wrap loosely in plastic wrap and microwave artichokes. For two artichokes I use a Corning quiche pan and use plastic wrap. Can u microwave a artichoke. If not done microwave for another minute and test for doneness again.

Cook on High for 15 18 minutes. Prepare the artichoke by cutting about ½-inch off the top and slicing off the stem leaving about ½-inch. Cover with a lid or plastic wrap. Wrap loosely in plastic wrap and place artichokes in the microwave.

Cook on High for 15 18 minutes. How long do I Microwave 2 artichokes. Youll learn a few simple tips and techniques to properly cook an artichoke using ingredients such as lemon water salt and olive oil. Cover the artichokes in plastic wrap and drop them in the microwave.

Cook for a maximum of 15-18 minutes. Check for doneness by pulling a leaf from close to the center of the leaves. The artichokes are ready when a knife easily penetrates the stem. Gently wrap the artichokes in plastic wrap and place in the microwave.

Add 1 inch of. Wrap loosely in plastic wrap and place artichokes in the microwave. The artichokes are cooked in the microwave by effectively steaming until tender. Prepare artichokes for steaming.

Cook on High for 15 18 minutes. For 2 artichokes it takes 8 minutes small artichokes to 9 minutes medium to large artichokes. For basic steamed artichokes youll want to cut close to the base so the artichoke can stand. Using a serrated knife cut off top 13 of artichoke.

What is the fastest way to cook artichokes. Boil high for 15 18 minutes. Remove the plastic wrap carefully so you avoid the steam and serve as preferred. How long do you cook an artichoke in the microwave.

For Roman-style artichokes or grilled artichokes remove only the browned bit at the end and leave the bulk of the stem attachedyoull peel it later. What is the fastest way to cook Jerusalem artichokes. Let the chokes sit for another 4 minutes still covered leave them sitting covered in a closed microwave. For one artichoke I can use a Corning casserole dish with a glass cover it works perfectly.

How long will I put 2 artichokes in the microwave. The artichoke is ready when a knife slightly pierces the stem. How to cook an artichoke in microwave. Place the artichokes in a microwave-safe dish with 12 cup water.

Wrap loosely in plastic wrap and place artichokes in the microwave. To check if theyre ready pierce the stems with a knife. For 1 artichoke it takes 6 to 7 minutes. Cut trimmed artichokes in half and rub with cut lemon.

A faster way to prepare and cook artichokes Prepare a steaming basket with a few inches of salted water boiling in a large pan. You can cook artichokes on the stove or in a pressure cooker.